
Protopanda is a open source patform (firmware and hardware), for controling protogens. The idea is to be simple enough so all you need is just a bit of tech savy to make it work. But at the same time, flexible enough so an person with the minimum knowledge of lua can make amazing things.
Telegram channel: https://t.me/mockdiodes Telegram chat: https://t.me/protopandachat
TLDR: At least a power bank of 20W with PD and usb-c.
There are two modes, one powering 5V directly from USB, and other that has some power management (buck converter), that needs from 6.5v up to 12v. This second mode is enabled only via hardware changes on the PCB. Each hub75 panel can consume up to 2A when maximum brightness, so powering directly from USB at 5v can be problematic, so this version with the regulator triggers the PD on the usb, requesting 9V 3A, and this is plenty of power to light up both panels, sadly this version consumes way more power.
Since on most cases you wont be running them at full brightness and neither all leds on white, it would be reccomended the 5v version. But some power banks cant handle the power spike upon startup. So choosing a version with PD is reccomended.
The panels used are also known as HUB75 panels. They are driven by mrcodetastic's hub75 lib, and these are the recommended panels.  They're multiplexed, which means only a few LEDs are on at a given time. It is fast enough that it can't be seen by the eye. But during direct sunlight, it's hard to take a good photo without screen tearing.
The resolution is 64 pixels wide and 32 pixels tall. Being two panels side by side, the total area is 128x32px. The color depth is 16 pixels, being RGB565, which means red (0-32), green (0-64), and blue (0-32).
To prevent another type of tearing when a frame is being drawn while the frame is being changed, we enable the use of double buffering. This means that we draw pixels to the frame, but they won't appear on the screen immediately. Instead, we're drawing in memory. When we call flipPanelBuffer(), the memory we drew is sent to the DMA to be constantly drawn on the panel. Then, the buffer we use to draw changes. This increased the memory usage, but it's a price needed to pay.
Protopanda uses images from the SD card and a few JSON files to construct the animation sequences. All images must be PNG; later, they're decoded to a raw format and stored in the frame bulk file.
To load frames, add them to the SD card and specify their locations in the animation.json file:
{
  "frames": [
    {"pattern": "/expressions/angry/angry%d.png","flip_left": false,"flip_right": true,"from": 5,"to": 9,"name": "frames_angry"},
    {"pattern": "/expressions/angry/angry%d transition.png","flip_left": false,"flip_right": true,"from": 1,"to": 4,"name": "frames_angry_transition"},
    {"pattern": "/expressions/blink/blink%d.png","flip_left": false,"flip_right": true,"from": 1,"to": 8,"name": "frames_blink"},
  ]
}
Note: Modifying
animation.json(adding/removing files) forces the system to rebuild the frame bulk file.
Each entry in the frames array can be either:
- A file path, or
- An object describing multiple files.
(Tip: Use this tool for printf-style patterns.)
pattern (string)
Uses %d as a placeholder for numbers (like printf). Requires from and to fields.
Example:
json {"pattern": "/bolinha/input-onlinegiftools-%d.png", "from": 1, "to": 155}
Loads frames from /bolinha/input-onlinegiftools-1.png to ...-155.png.
flip_left (boolean)flip_right (boolean)
Flips the right-side frame horizontally (useful for panel orientation).
name (string)
Assigns an identifier to a frame or group. The name refers to the first frame in the pattern.
Why? Hardcoding frame orders (e.g., [1, 2, 3]) becomes problematic if you later insert a new frame. Names act as offsets for flexibility.
color_scheme_left (string)
Flips specific color channels if needed.
Use any permutation of "rgb", "bgr", "rbg"
After loading frames, Lua scripts manage expressions. These are defined in /expressions.json:
{
  "frames": [],
  "expressions": [
    {
      "name": "normal",
      "frames": "frames_normal",
      "animation": [1, 2, 1, 2, 1, 2, 3, 4, 3],
      "duration": 250
    },
    {
      "name": "sus",
      "frames": "frames_amogus",
      "animation": "auto",
      "duration": 200
    },
    {
      "name": "noise",
      "frames": "frames_noise",
      "animation": "loop",
      "duration": 5,
      "onEnter": "ledsStackCurrentBehavior(); ledsSegmentBehavior(0, BEHAVIOR_NOISE); ledsSegmentBehavior(1, BEHAVIOR_NOISE)",
      "onLeave": "ledsPopBehavior()"
    },
    {
      "name": "boop",
      "frames": "frames_boop",
      "animation": [1, 2, 3, 2],
      "duration": 250
    },
    {
      "name": "boop_begin",
      "frames": "frames_boop_transition",
      "animation": [1, 2, 3],
      "duration": 250,
      "transition": true
    },
    {
      "name": "boop_end",
      "frames": "frames_boop_transition",
      "animation": [3, 2, 1],
      "duration": 250,
      "transition": true
    }
  ],
  "scripts": [],
  "boop": {}
}name (string, optional)
Identifies the animation (e.g., for menus or scripting).
frames (string)
References a frame group from animation.json.
animation (int[] or "auto")int[]: Explicit frame order (e.g., [1, 2, 3])."loop": Sequential frames (e.g., 1, 2, 3...)."pingpong": Sequential frames then reversed (e.g., 1, 2, 3... ...3, 2, 1)."loop_backwards": Backwards Sequential frames (e.g., ...3, 2, 1).
duration (int)
Frame display time (in milliseconds).
hidden (string)
Hide from menu selection
intro (string)
This parameter is a name of another animation that MUST be a tranistion=true. A animação será tocada sempre que essa expressão entrar
outro (string)
This parameter is a name of another animation that MUST be a transition. This transition will play whenever the current animation stops running
transition (boolean)
If true, the animation plays once and reverts to the previous state. This will force the animation to stack and not remove the previous one
repeats (int, default 1) If the animation is the type of a transition, you can set this to force it to repeat N times
onEnter (string, Lua code)
Executes when the animation starts.
onLeave (string, Lua code)
Executes when the animation ends (either due to transition=true or interruption).
The expressions are stored in a stack. So when you add an animation that doesn't repeat, it will pause the current animation and run until the end of the new animation. If you add two at the same time, the last one will be executed. When it finishes, the previous one will run.
Even with the SD card, changing frames is not quite fast. The SD card interface is not fast enough. To make it faster, the images are PNG decoded to raw pixel data stored in RGB565 format inside the internal flash. All frames are stored in a single file called the Bulk file. This is done in a way that the frames are stored sequentially, and by keeping the file open, the transfer speed is accelerated, achieving 60fps. Every time you add or modify a new frame, it's needed to rebuild this file. This can be done in the menu or by calling the Lua function composeBulkFile.
The animations are processed by Core 0, so you don't have to waste some precious time on the lua scripts updating it. It is possible to change the frame using Lua scripts... But it's also wasteful. So leave it to the other core, and you only have to worry about selecting which expressions you want! During managed mode, the frame drawing is handled by Core 0. 
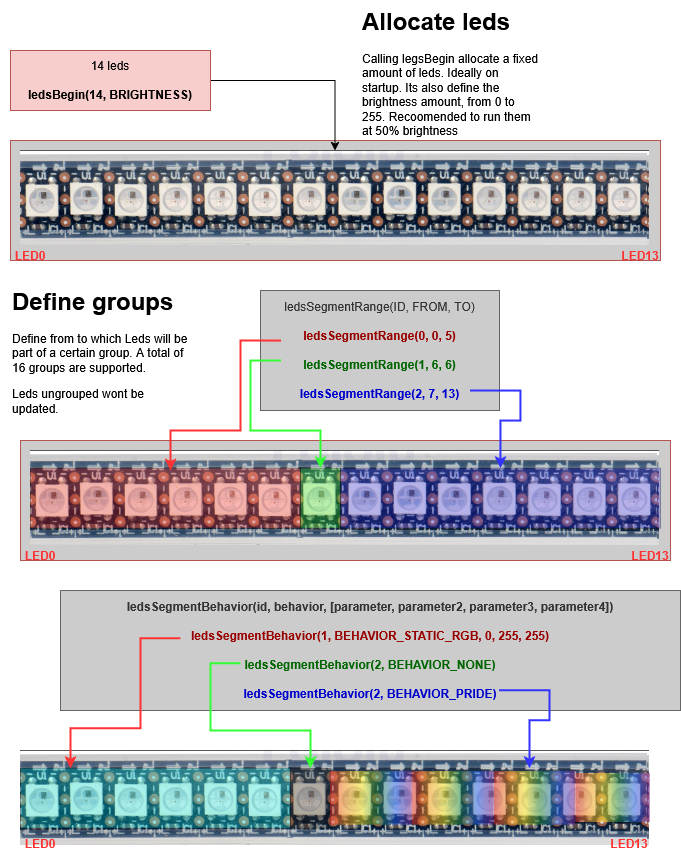
Protopanda suport the WS2812B adderessable led protocol and it provies a simple crude system to defining a few behaviors for the strip/matrices 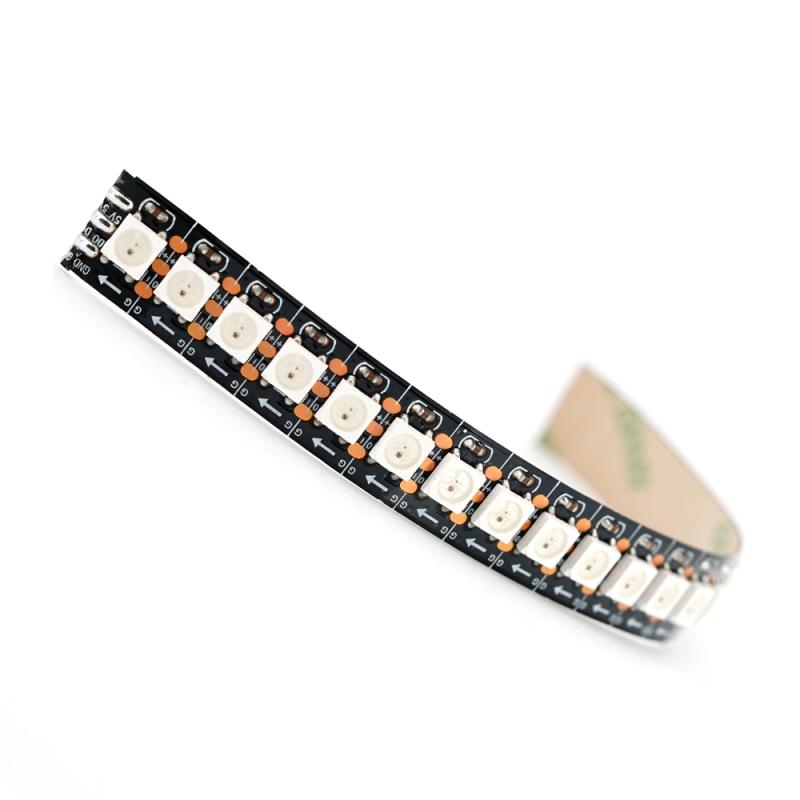
alt text
Since version 2.0, its supported almost any kind of BLE device that have HID. All you need to do is adapt the driver if needed or write a new one. Currently the devices supported are: * https://github.com/mockthebear/ble-fursuit-paw * https://pt.aliexpress.com/item/1005008459884910.html * https://pt.aliexpress.com/item/1005009845485445.html
What would do best is a BLE joystick.
Currently the default keybinds are
{
  "keybinds":{
    "joystick.right_hat=5": "BUTTON_LEFT",
    "joystick.right_hat=3": "BUTTON_DOWN",
    "joystick.right_hat=1": "BUTTON_RIGHT",
    "joystick.right_hat=7": "BUTTON_UP",
    "joystick.buttons.4": "BUTTON_CONFIRM",
    "joystick.buttons.1": "BUTTON_BACK",

    "beauty.buttons.4": "BUTTON_LEFT",
    "beauty.buttons.1": "BUTTON_DOWN",
    "beauty.buttons.3": "BUTTON_RIGHT",
    "beauty.buttons.2": "BUTTON_UP",
    "beauty.buttons.5": "BUTTON_CONFIRM",
    "beauty.buttons.6": "BUTTON_BACK"

  }
}
They all map by default for the BLE fursuit paw
Protopanda is designed to run on Esp32s3-n16r8, which is a version with 16MB Flash, 384kB ROM, 512 Kb RAM, and 8MB octal PSRAM. It is required to be this version with more space and the PSRAM to have enough RAM to run the panels, BLE, and lua together.
On the hardware, there is a port for the HUB75 data, an SD card connector, two screw terminals for the 5V out, the power in pins, one I2C port, and the LED strip pin.

Diagram

Ports

Diagram
Protopanda uses and abuses the two cores in the ESP32.
* Core 0 By default, Core 0 is primarily designed to manage Bluetooth. When not doing so, it manages the animations, and when Managed mode is active, it also handles the LED screen updating. * Core 1 The second core handles non-screen-related tasks. It has the routine that checks the power level, updates the inputs, reads sensors, and calls the Lua function onLoop.
We know not all of us can build a PCB from scratch, so i'm providing a way you can build your own reduced version of protopanda. 
--Minimum lua script on init.lua

function onSetup()
  --Function is called once, here you may start the BLE, begin scanning, configure panel, set power mode, load lib and prepare led strips and even power on
  --All calls here are called from SETUP, running on core 0
end

function onPreflight()
  --Upon here, the all lua calls are called from core 1. You can even leave this function in blank.
  --Core 0 will only start managing after 100ms (the final beep)
end

function onLoop(dt)
  --This function will be called in loop.
  --The dt parameter is the difference in MS from the begin of the last frame and current one. Useful for storing elapsed time
endlocal expressions = dofile("/lualib/expressions.lua")
local changeExpressionTimer = 1000 --1 second
function onSetup()
setPanelMaxBrightness(64)
panelPowerOn() --Brightness always start at 0
gentlySetPanelBrightness(64)
end
function onPreflight()
setPanelManaged(true)
expressions.Next()
end
function onLoop(dt)
changeExpressionTimer = changeExpressionTimer - dt
if changeExpressionTimer <= 0 then
changeExpressionTimer = 1000 --1 second
expressions.Next()
end
end